Sunday, August 17, 2014

Repurpose-Restyle-Reupholster


This particular post is about Repurposing what you have. My customer had just sold their large house that was decorated with a more formal traditional feel. Her furniture was big, bulky and for the most part dark wood. She wanted to know how (or even if) her furniture could be used at her new lake house where they are wanting to change their very formal taste into a more casual cottage feel. 


 So this is what we started with, an already lovely coffee table with great storage. The customer was in need of extra seating but this bulky coffee table was using up so much of her living space. So I decided to repurpose this table into an ottoman, serving multiple uses as a table or using alone as extra seating during family gatherings and she still has the storage!


I started off by painting a couple of layers of (denim by American Paint Co) paint over the entire piece. I usually like to use a rounded artists brush when I paint legs with shape and detailing, it just seems to get all the "nooks-n-crannies a bit easier.


Meanwhile as I wait on my paint to dry, I measure out a graph on a piece of 3/4" plywood (cut to the exact shape of the top of table) of where my buttons should be I measured approx 5-6 inches apart on this particular piece. I then preceded to pre-drill my holes in preparation for the tufting.


I like to do a quick layout before I start tufting just to step back and get a good visual of how it's going to look, that way if I need to make any adjustments I can at this point. But, I'm liking it so I'm going to just go for it.


Next steps were painting another layer on the base of the table a nice fresh cottage white -allowing the denim to slightly show.
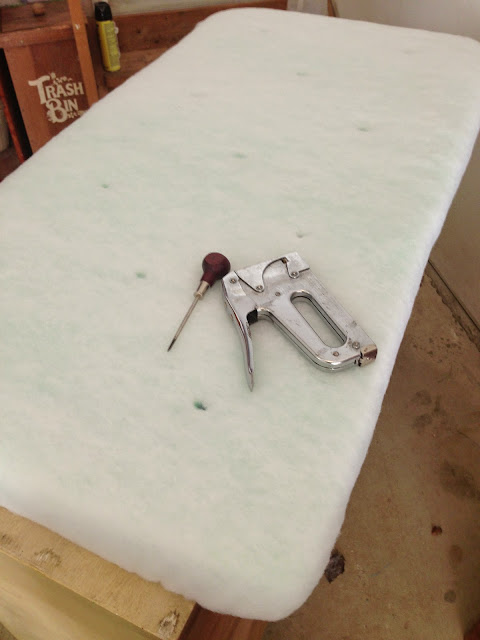
Then measure out the 2inch foam layer. (The easiest method I have found so far to cut thick foam with control is an electric knife). If your table has a unique shape to the top, it's worth it to take a little extra effort and time to make your padding follow that shape rather than just a basic rectangle, that's what gives something a "custom" one of a kind look.


Following the same graph for my holes that I pre-drilled, I just used a "pick all" (carpenters use this tool on hard wood to start holes before they use wood screws) on both the foam and then also on the next layer of lining so that I can easily find my pre-drilled holes as I'm sewing in the buttons.


Make sure the corners of your lining are fastened down very-very smooth and flat, (cut away the excess underneath) this will have an impact on your finished corners and whether they look bulky and uneven or smooth and tailored ...take your time and do it right the first time. 


I chose a heavy but beautiful knotted rope patterned fabric that will pull in a very nice but yet subtle "nautical" feel to the Lake-house.
After covering all of your buttons, (we all have seen how covering buttons are done so I'm not including instructions on that) I wanted to share with you how I personally like to upholster a larger piece when I'm doing it alone. Rather than having to turn your fabric board back and forth during the "tufting" process I prefer using the "workhorse" method (or as you see I just used pieces of furniture nearby that are in my shop) so that the piece is held sturdy on each side and I can work on "tufting" the seat from the top and sewing the buttons by pulling down from the open space underneath. The durable thread is then securely stapled in three back and forth positions to ensure a tight hold. Lastly you just simply attach the fabric board to the tabletop by pre drilling holes on the topper and then securing the fabric board with about 6 screws drilling from the underneath of table up into the 3/4" fabric board. Make sure your screws are not too long or they will make for a very uncomfortable seat ;)


And "ahoy Matie" she's ready to sail off! The perfect addition to a small Lake house that serves multiple uses! Storage, seating, table (when used with a tray) and of course an ottoman.


Tuesday, August 5, 2014

"Mangy Things"


 It was the oh so perfect day and much to my pleasure it happened to be the Rt40 yard sales that ran for miles upon miles just full of "junkin' goodness"..... an UPcyclin' gals lil' slice of heaven!
 I found these thankfully at one of my first stops so I had plenty of vacant room in my blanketed trunk just waiting for something unique and special. There they lay, all heaped up in a disarray of piled beauty! I think my heartbeat just slightly fluttered as I quickly went towards the local farmer that was having the sale. "Sir, how much for the old church pew side panels?" he just looks at me with his crooked grin and wrinkled forehead and says "Now darlin' just whatcha' gonna do with those mangy ole things?" I said "Well I'm not quite too sure but I have all kinds of ideas just racing through my head! A headboard? Shelves? Heck, I would love those just hanging on my wall "as-is!" He just laughs and chuckles as he helps me load these ole beauties and proceeds to tell me they were all heaped up for a big fire he was planning on having at the end of the night with other wooden debri left behind. All I could do was GASP in horror of the thought! 
And this my friends is the mind of a true "junker" we see things entirely different and are able to visualize the potential of great shapes and texture to UPcycle it into a great useful piece of art, furniture, home decor or...maybe all of the above??

So, since we have four of these great side panels we have decided to pair two of  them up with an old solid door that we had in storage and create another hall-tree ....everyone loves a good hall-tree!

After figuring out the layout and design my husband built a sturdy new bench that would fit into where the original seat would have been. After cleaning (putty any holes you want hidden, I personally don't like the newer screws to be visible) applied a bright turquoise on the base coat to both the bench and the old door.


Next is the application of the white top coat, again I use the "dragging technique" to help blend the old wood with the newer wood. I like to work in layers to give it the illusion of having been painted many times throughout the years. Keep adding the layers until you get it as light as you want it.

I thought it would be really cool to turn this into a message board as well so I decided to go with Chalkboard paint (not to be confused with chalk paint-you will need to apply primer the base before you use the chalkboard paint-don't forget that important step).

At this same time I installed these really cool coat hooks on each side of the door keeping the chalkboard the middle focal of the piece.    


And this is what we created with rescued side panels that narrowly averted a fiery end. They now have a new look, new use and are ready for their new life as a hall-tree message board!


I chose to leave the molded detailing in its natural state for a bigger impact of the design on it.


Special surprise! The back is also a message board for those that want to display it in an open area!

Thanks so much for dropping by the studio, keep that creativity pumpin' and keep those landfills clear by reusing what you can, ya never know ...ya might just make something pretty darn cool!!!

Saturday, August 2, 2014

The Marriage of Barbed Wire and a Paint Brush

A Lust For Rust  


I just love combining unexpected mediums and texture to my work it gives it that "element of surprise" 


But, first things first! step one is finding an old door, something nice and solid. We then simply split it down the middle and supported it on the back.


Next step, I chose a medium turquoise paint (I used my own chalk paint for this project) then I applied a light fresh white tone in layers using the "dragging" method. Add layers until it is covered with slight peeks of color coming thru in various places. You can also use a putty knife to scrape away some of the layers as well if you wish.

I initially had scrap wood pieces in the missing glass panes and was thinking of a paint texture or painted art detail to add but I just wasn't loving it-it was missing that "wow"...so I started fumbling through all my "extras" hanging around the house.


And when I say "hanging around" the house, I mean literally "hanging around" the house. I had bought this old rusted barbed wire from a scrap dealer, pulled it out of the trunk and plopped it up on the closest hook I found which just happened to be my front door. (I actually really liked it there...can't say my family did though, lol)
.   

So, to cut this thick wire I found some very heavy wire cutters. Don't forget to wear gloves if you try this!! Using wire snips and pliers I went to town making different scrolling designs with the wire. 


I just hammered the barbed wire down with U tacks for a sturdy hold ....main thing needed here? Patience! 

And then lastly the shelves were painted and attached and "Whaaaa-Laaa!!!" There you have it, a super cool UPcycled door that is now a "One-Of-A-Kind" corner shelf with rusted barbed wire giving it an original artistic touch. Don't forget to mount this to your wall for extra protection, especially those parents out there with "climbing kiddos", remember to keep em safe!